Related Parts
View More
The new PIC18F252-I/SO Arduino Board Adds WiFi and Bluetooth
Arduino is a popular platform for makers, and with good reason. Its simple programming language and wide range of accessories make it perfect for all sorts of projects. One recent addition to the Arduino family is the PIC18F252-I/SO, which adds WiFi and Bluetooth capabilities to the board. This updated board makes it easy to connect your Arduino to a variety of devices and networks, making it an ideal choice for makers who want to expand their project horizons.
What is the PIC18F252-I/SO Arduino Board?
The PIC18F252-I/SO Arduino Board is a small, low-cost, and easy-to-use parallel microcontroller board that incorporates the popular ATmega32U4 processor. It includes an onboard USB 2.0 port, a 6 MHz crystal oscillator, 4 KB of flash memory, and 2 KB of SRAM. The PIC18F252-I/SO also supports Bluetooth LE (Low Energy) communication, making it perfect for embedded applications that require wireless connectivity.
Features of the PIC18F252-I/SO Arduino Board
The PIC18F252-I/SO Arduino Board is a new board that adds WiFi and Bluetooth capabilities to the standard Arduino platform. The board includes an ATmega32U4 microcontroller with 448 KB of flash memory and 60 KB of SRAM, as well as a W5100 Wi-Fi chip and a BTLE module.
The PIC18F252-I/SO Arduino Board can be used to create simple devices that connect to the Internet or other devices using wireless technology. Additionally, the board can be used to create projects that use Bluetooth technology to communicate with other devices.
WiFi and Bluetooth on the PIC18F252-I/SO Arduino Board
The new PICF-I/SO Arduino board adds WiFi and Bluetooth capabilities to the platform. The WiFi module uses the 802.11b/g/n standard and has a range of up to 100m. The Bluetooth module supports both BLE (Bluetooth Low Energy) and classic Bluetooth protocols, with a range of up to 10 meters.
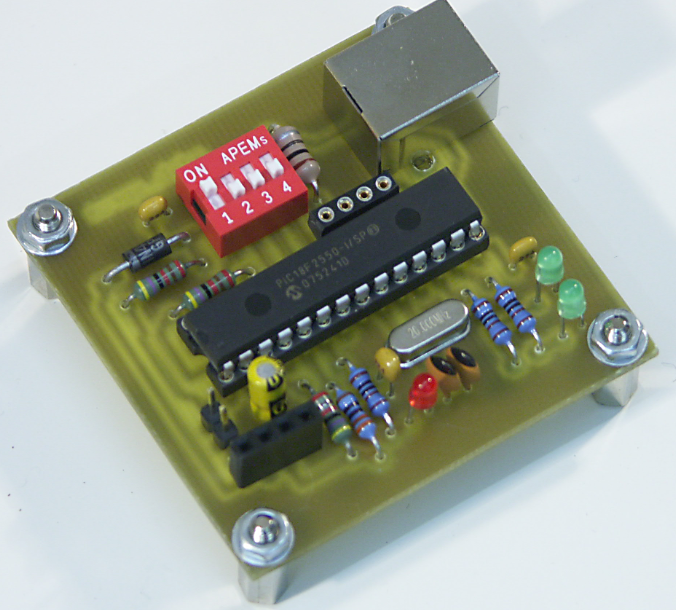
The board also includes an SD card slot, a USB 2.0 port, and an ATMEGA328P microcontroller with 32 KB of flash memory and 4 KB of RAM. It is available in both a pre-assembled form (pictured) and as a kit that you can build yourself.
How to Install the Arduino Board?
Arduino is a popular open-source platform for digital fabrication, and building electronics projects from scratch. The new PICF-I/SO Arduino board adds WiFi and Bluetooth capabilities, making it a powerful tool for prototyping and programming.
To install the Arduino board, you will need to download the appropriate software and connect the board to your computer.
First, download the Arduino software from. Once downloaded, unzip the file and double-click on the Arduino application icon to start up the software.
Next, connect your board to your computer using a standard USB cable.
The next step is to select your board type in the Arduino menu bar:
If you have an earlier version of the Arduino software (for example v1.5 or earlier), click on ” Boards ” in the main window, select “Arduino Uno” or “Arduino Leonardo” from the list of boards that appears, and then click on ” Install ” to install this board type on your computer
If you have a later version of the Arduino software (for example v3.0 or later), click on ” Menus ” in the main window, select ” Tools “, then click on ” Board “. In this window, you will see three tabs: Basic , Ethernet, and Serial. If you want to use this board with Bluetooth LE, be sure to check the fourth tab called “
How to Use the WiFi and Bluetooth Functions of the Arduino Board?
The Arduino Board is a great platform for creating IoT projects, but it can be difficult to connect to the internet or to other devices. The WiFi and Bluetooth functions of the Arduino Board make it easy to connect to the internet or other devices.
To use the WiFi function of the Arduino Board, you will first need to install a WiFi module. You can find many different WiFi modules on Amazon. Once you have installed the WiFi module, you can connect your Arduino Board to the internet using your computer’s network connection.
To use the Bluetooth function of the Arduino Board, you will first need to install a Bluetooth module. You can find many different Bluetooth modules on Amazon. Once you have installed the Bluetooth module, you can connect your Arduino Board to other devices using Bluetooth technology.
Downloading and installing the Arduino IDE
The Arduino IDE software is a popular cross-platform programming environment for creating sketches that control electronic devices. The Arduino IDE can be downloaded from the Arduino website. After installation, open the Arduino IDE and select “File”→”Preferences.” In the “General” tab, make sure the “Use system libraries” checkbox is checked and click OK. Under the “Additional Boards Manager on the Board tab and verify that your board is listed. If your board is not listed, select it in the list and click on “InstallShield Wizard.” In the opened window, click on Next and fill in all required fields.
Click on Finish and wait for the update to install. Once completed, close the Board Preferences window and open your sketchbook (File→Open). To test the connectivity of your Arduino board to WiFi or Bluetooth networks, follow these steps: 1) Connect your Arduino board to a power source and start it up; 2) Open a web browser and enter 192.168.2.* into its address bar; 3) Click on a link in an email or message that you receive while connected to WiFi or Bluetooth; 4) If you are using a WiFi network, you should see signs of activity such
Basic programming tasks with the PIC18F252-I/SO Arduino Board
Using the PIC18F252-I/SO Arduino Board
To program the board, you need to install the appropriate software. The Arduino IDE is a popular choice, but there are other options available.
This board supports both 8-bit and 16-bit code, so you can use all of the same programming tools and techniques that you’re familiar with. In this guide, we’ll show you how to set up the Arduino IDE and get started programming.
First, make sure that your computer has an SD card reader installed. This board uses a standard microSD card for storage. Once your SD card is ready, follow these steps to install the Arduino IDE:
1) Open your computer’s browser and go to Arduino.cc. Click on the “Downloads” link at the top of the page to access the latest version of the Arduino IDE.
2) Click on the “Arduino installation files” link in the downloads section and save the file onto your hard drive. (If you don’t have an SD card reader or don’t want to install software onto your computer, you can find instructions for using a USB cable here .)
3) Double-click on the Arduino_UNO.exe file that was downloaded in step 2 to launch the Arduino IDE. If everything goes well, you’ll see a window like this:
4) At the top of the window, make sure that the ” Boards ” tab is selected. Then, click on the ” Add New ” button and select the PIC18F252-I/SO board from the list of boards that appears.
5) In the code editor that pops up, type these two lines of code into the editor window:
void setup() { } void loop() { }
Now, hit the “Upload” button to start uploading your code. (If everything goes according to plan, you should see a message indicating that your code has been uploaded and uploaded successfully.) If not, check to make sure that your SD card is correctly inserted into your computer and that you’ve followed all of the installation instructions correctly.
Conclusion
The PIC18F252-I/SO Arduino board is a great addition to any maker’s toolkit, adding WiFi and Bluetooth capabilities to the microcontroller. With these features, you can create projects that use these wireless protocols in innovative ways. The board is also affordable and easy to use, making it a great choice for new Arduino users as well as experienced makers.